Ogres! Ogres! Ogres!
On Christmas we come back tough! With all this free time, we decided to join the three of us. We were discussing about what we could do on a free Christmas afternoon. The options were to beggin a new scenery project that we are plotting (you'll see when it be done!), play a battle between the armies that participated in our last workshop (Orcs vs Wood Elves; http://atresomas.blogspot.com/2011/12/muestra-taller-en-el-ies-el-portillo-de.html) and then write a battle's report of the crash; or...fix our Ogre army, which was a little bit abandoned .After a deep meditation, we took our brushes and we started to fix this funny and, definitely, brutal horde.
We hope you enjoy the results!
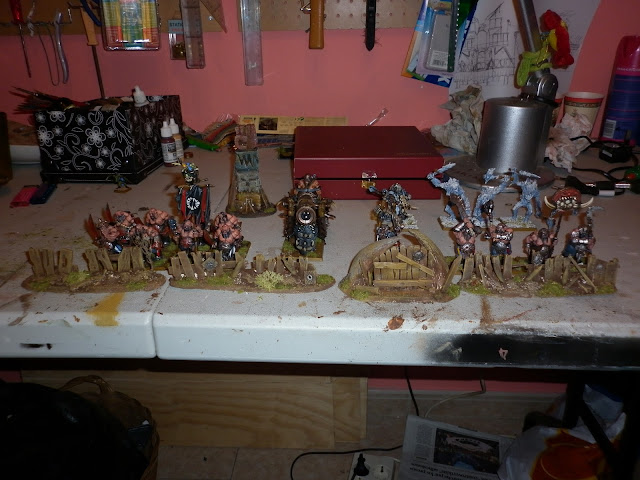
Overview of our area of work at the beggning of the afternoon. As you can see we had the miniatures practically painted. We just wanted to repaint skins and details (faces, new tattoos, banners and weapons, etc.), apart of improving some bases.
The closest pair of Ogres are just with the skin base paint. We decided to make our Ogres tanned (as every good Ogre should be), applying a 60% Dwarf Fesh and 40% Scorched Brown mix.
Do not miss out of sight the Hunter in the upper-right corner.
Do not miss out of sight the Hunter in the upper-right corner.
Ogres in process. The nearest one is completed, tattoos included (in their backs they have more). The second and third paints has been made degrading more and more the mix we named in the last step, until reach a 90% Dwarf Flesh and 10% Scorched Brown. In the last light we just applyed Dwarf Flesh.
We had this Ironblaster (painted by Borja Rodríguez Bolea) and this Hunter unfinished. They couldn't stay out of our army! Check that both miniatures doesn't have base or is uncompleted. Moreover, the Hunter has some faults in the paint that we will fix later.
After a couple of hours working, we completed the Ironguts! The banner was neccesary to drill it and join both parts with wire, cause it was broken after some transports. (Check the Ogres skin tone compared with the Hunter's one, much more pale).
Ogres unit completely fixed. Take a look of the Crusher tattoos details (with hunting trap).
Another view of the Ogres. Amazing.
Watch out with those Yhetees! We had the poor Yheetees totally abandoned. After fixing their hands (all of them were out of position) with the drill, we repaired the skin faults and we reshaped the bases to give them coherence with the rest of the army. We painted all their bases with the same colour and we added the snowed grass. Snow on the Yhetees looks great!
What do you think about this completed Hunter? After fixing his paint we added the javelins in his back and modified the base to look like the Yhetees's one. It is quite simple: 1º paint the base with a dark grey and blue mix, 2º apply white glue all over the base and 3º add the grass and chopped polystyrene (in many miniature stores you can find it).
And finally here you have the overview of all our reparations of yesterday.
The Ironblaster in the center, with a base and finished, looks spectacular along with our Tyrant.
The Ironblaster in the center, with a base and finished, looks spectacular along with our Tyrant.
We still have some units to finish, like our Leadbelchers or one Scraplauncher (we neither forget a unit of Gnoblar Fighters and their Trappers). But for an afternoon work it was more than enough. We will upload more photos when we will start with the other units.
This new army will be unstoppable in our next battles and workshops.
This new army will be unstoppable in our next battles and workshops.
The next post will be a tutorial about how to build the barricades, the gate and the totem that the Ogres show in their photos. You'll see how easy and quick is to build and make them look really nice.
Cheers and thanks to all of our followers.
P.S.: MERRY CHRISTMAS!!


